DexUMI Hardware Assembly Tutorial

Step-by-step guide for building your DexUMI exoskeleton

Exoskeleton Model Preview

Explore the CAD views of both XHand and Inspire Hand DexUMI

Click on a model to view it directly in Onshape. You can also export the model in various 3D formats supported by Onshape.

  • Download Formats: STL, STEP, SolidWorks, and more
  • Printer: Bambu X1C
  • Material: PLA-CF
  • Print Settings: 50% sparse infill density, 50% infill/wall overlap, 10 wall loops

Feel free to tweak the settings based on your printer and material availability!

PCB Sourcing

Information for sourcing and fabricating DexUMI circuit boards

Step-by-step Tutorial of Ordering PCBA

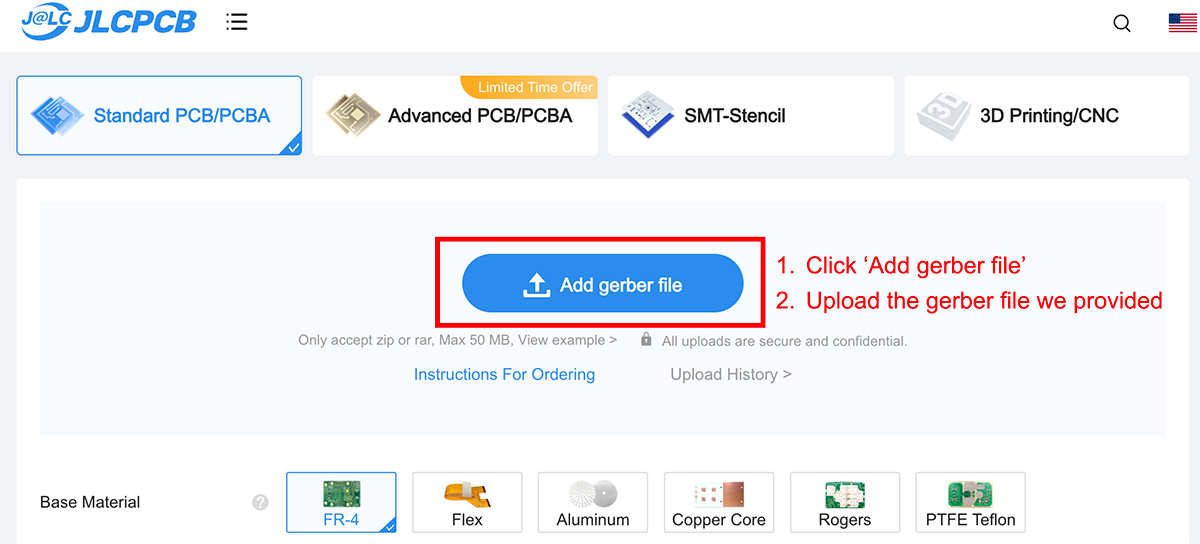
To get started, you’ll first need to order the DexUMI circuit board. In this tutorial, we use JLCPCB as the PCB manufacturer.
On the JLCPCB homepage, click the Order Now button and follow the step-by-step guide in the image tutorial below.

First, upload the Gerber file we provided (click the download button above to get it).

Add Gerber File

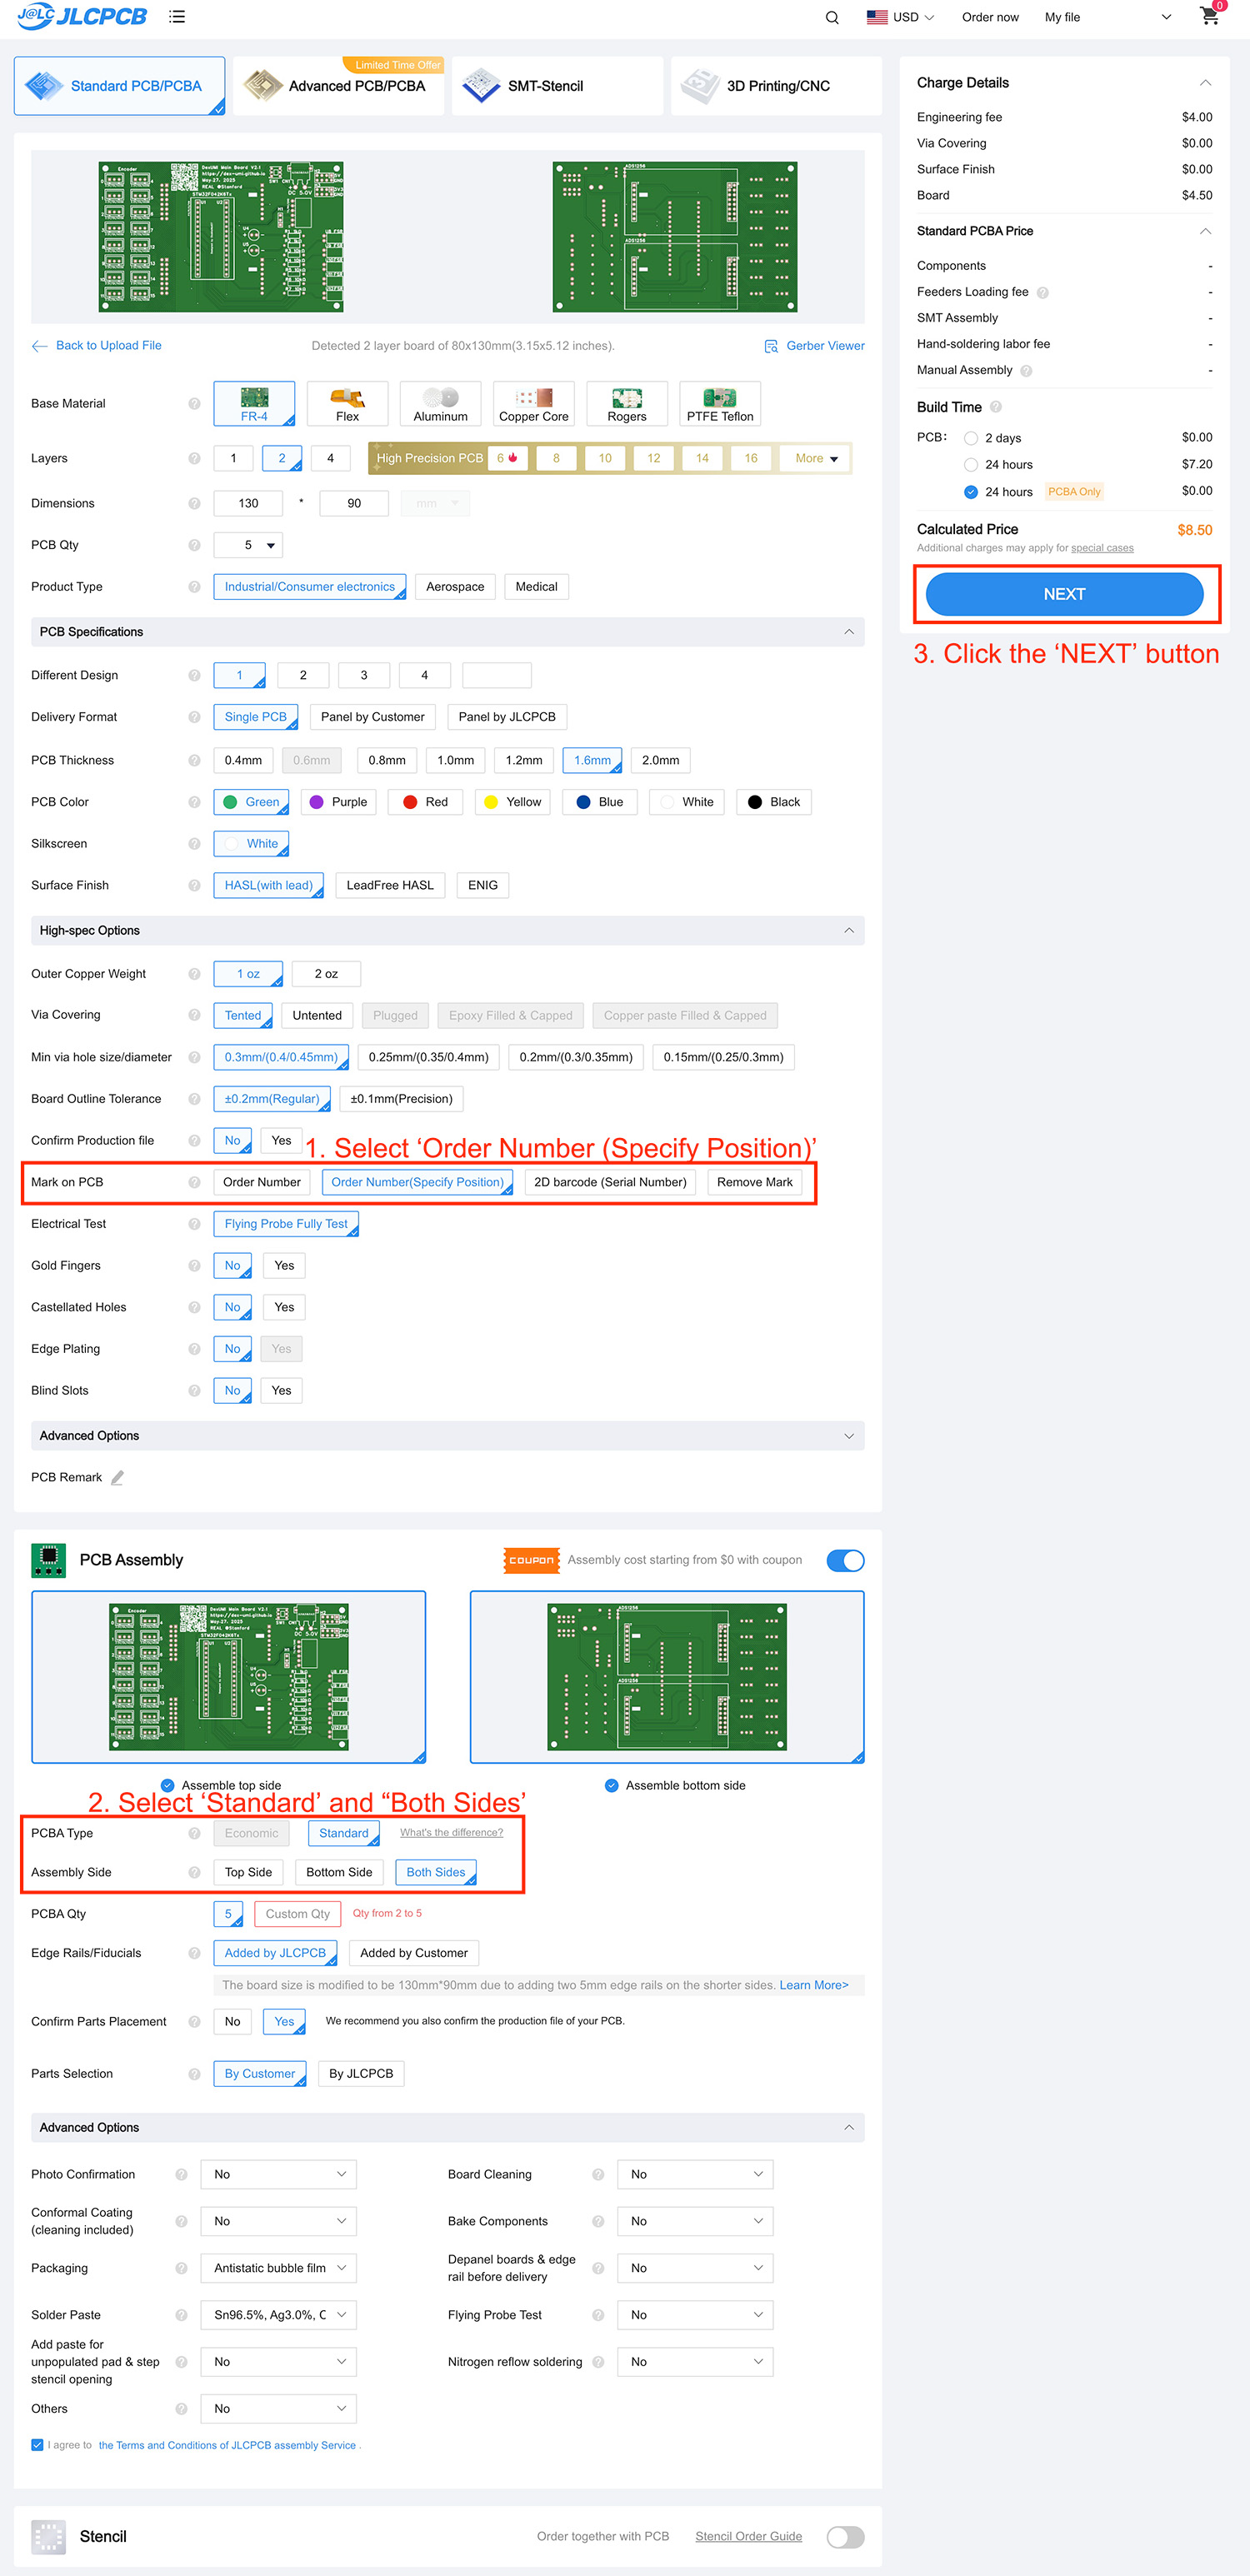
Second, follow the image tutorial below to select the correct manufacturer parameters.

PCB Manufacture Settings

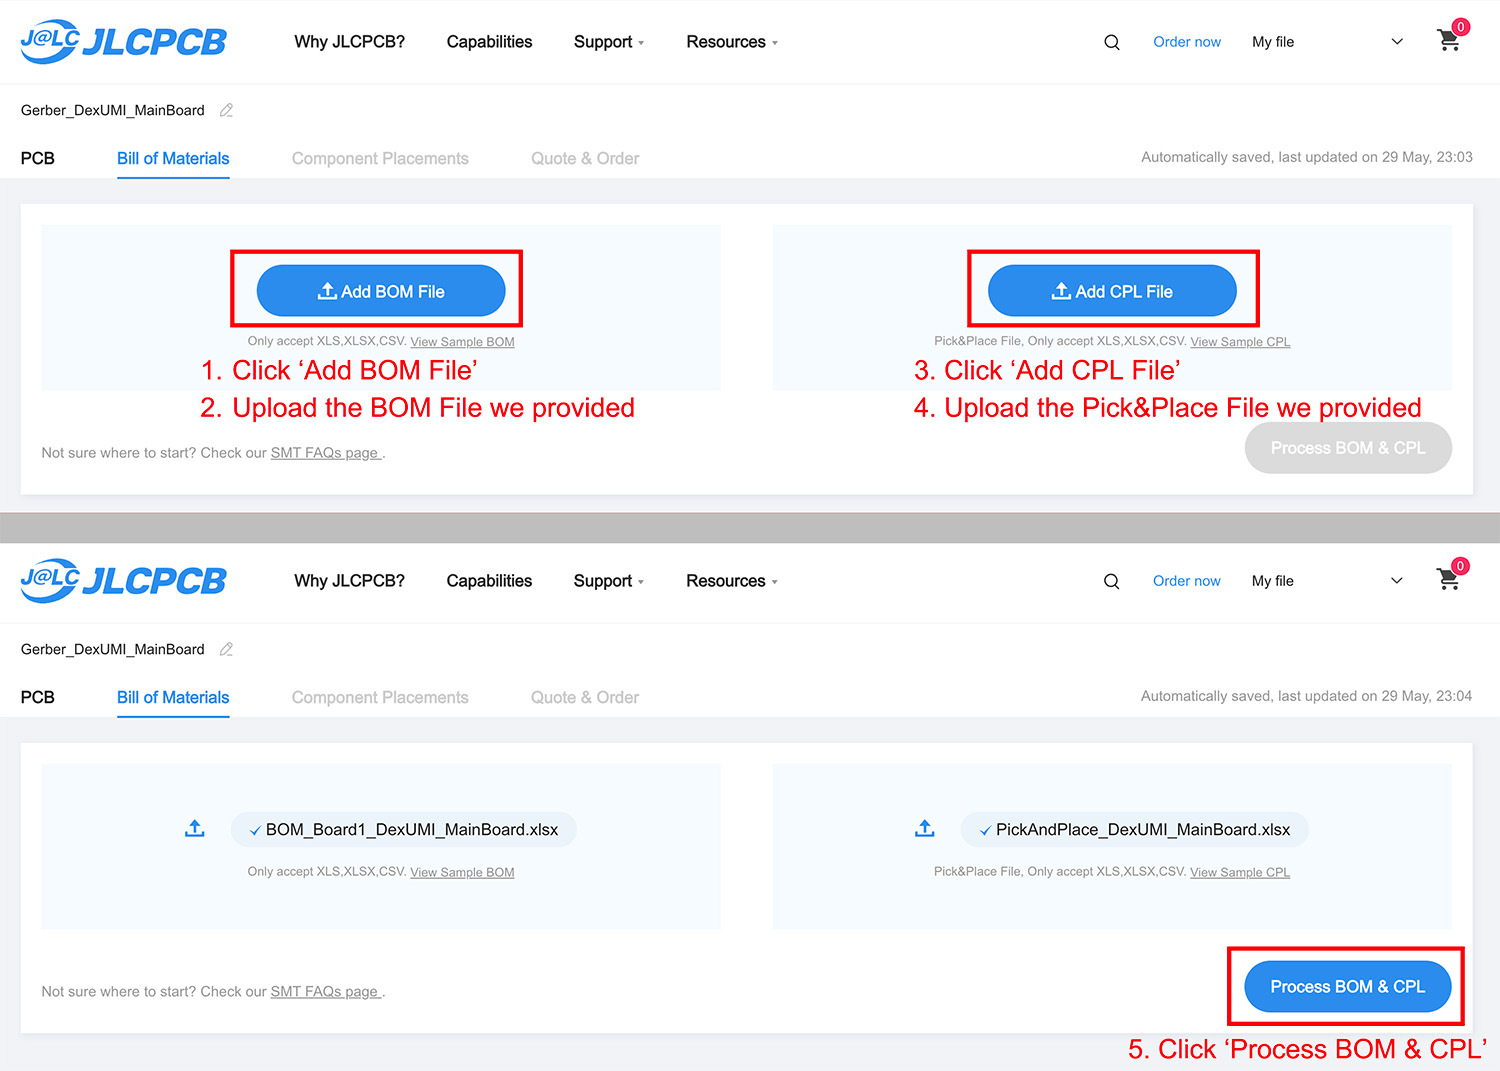
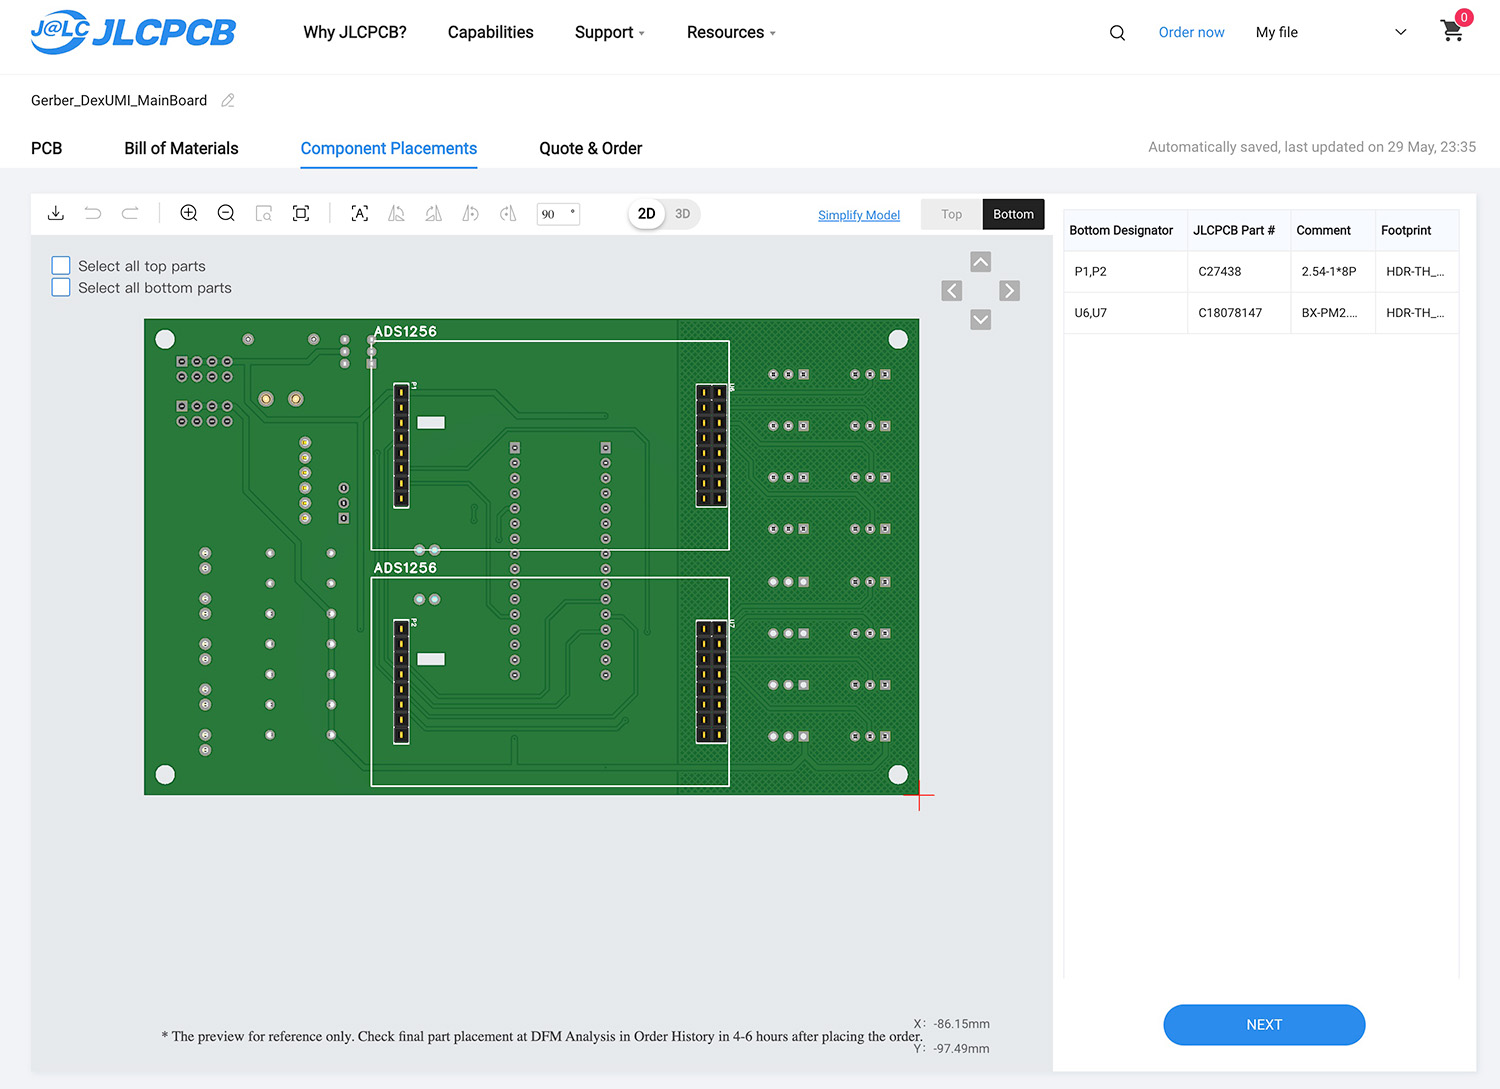
On the new page, click the Bill of Materials column, then upload the BOM file and Pick and Place file we provided.

Add BOM and Pick and Place

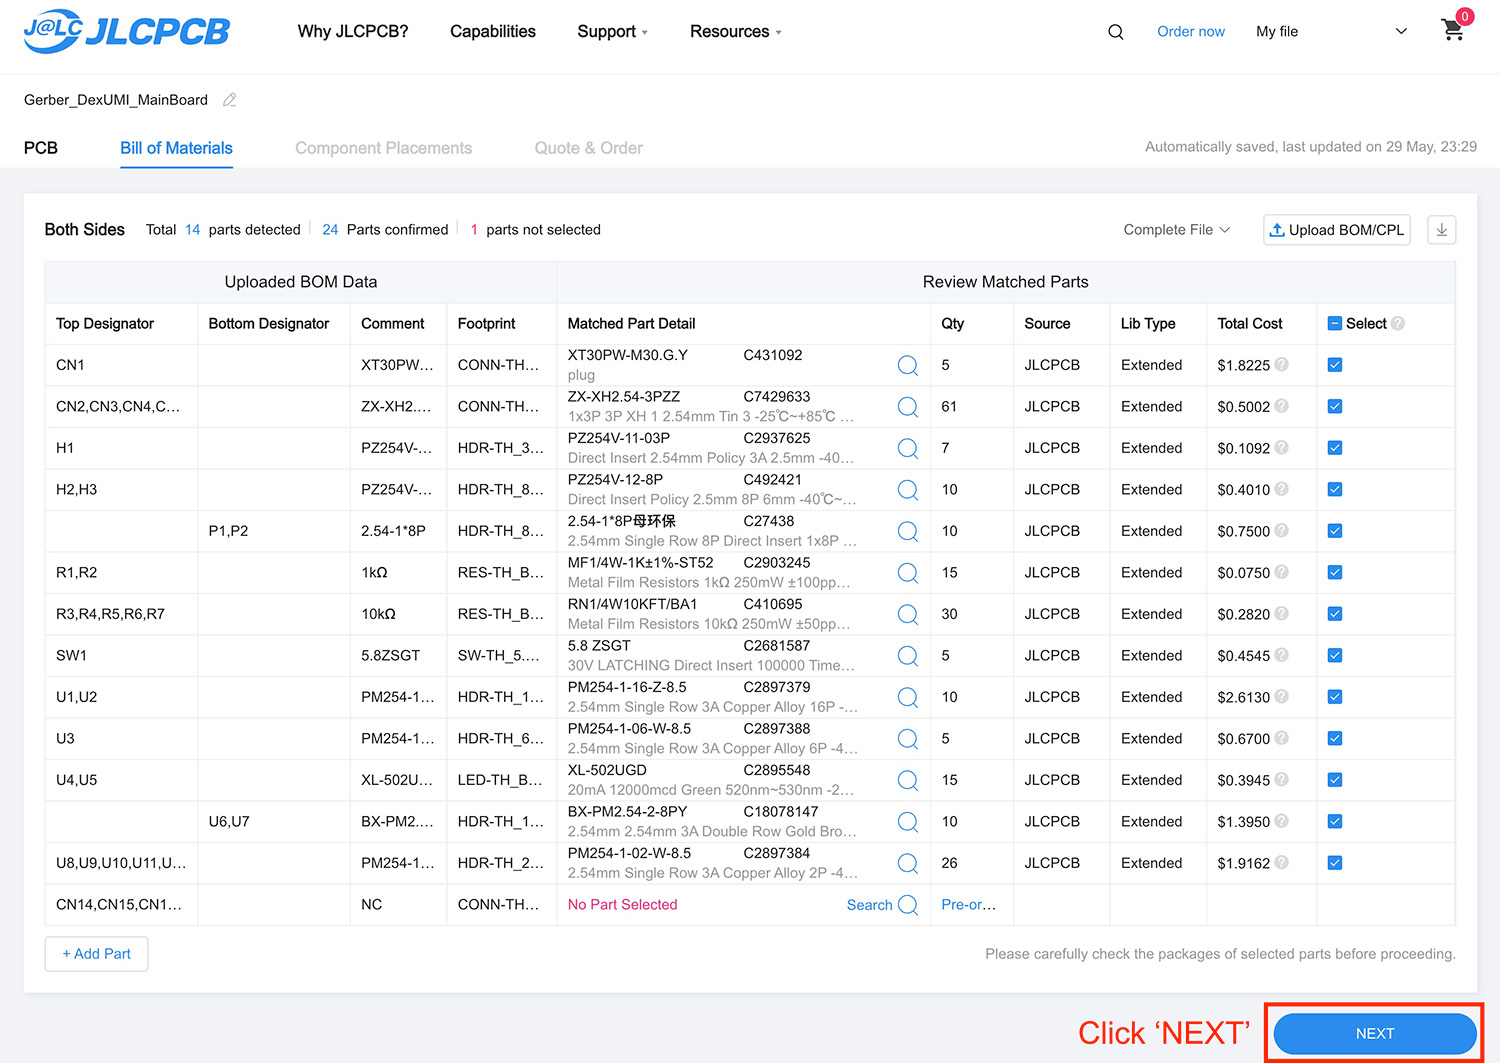
After processing, you’ll be presented with a parts confirmation list. If everything is in stock, simply click the NEXT button. If not, you’ll need to manually select similar parts using the suggestions provided by the ordering system.

Parts Confirmation

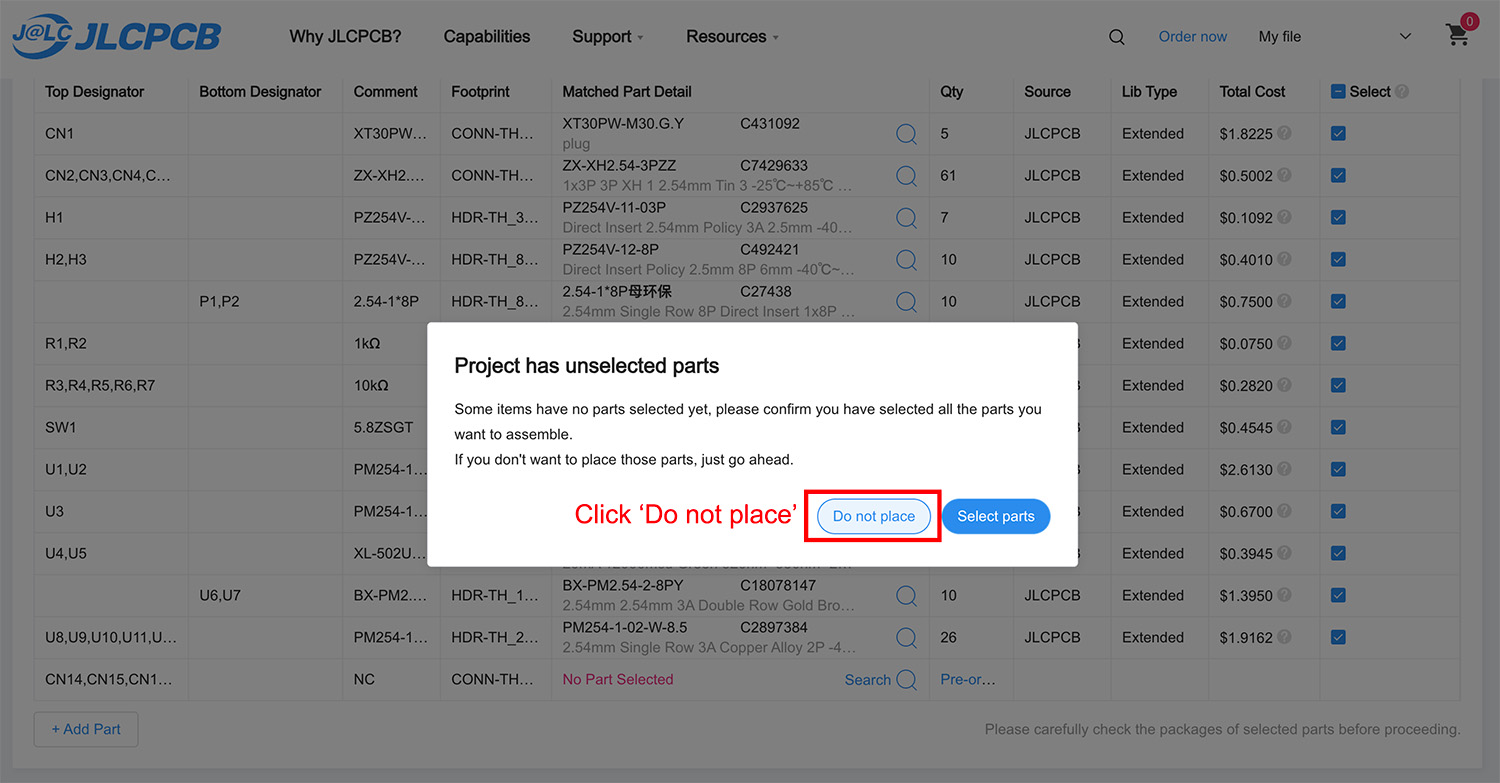
The system may display a message like Project has unselected parts. Don’t worry — this happens because we include some NC (Not Connected) parts, which are not meant to be assembled. Simply click the Do not place button to proceed.

Unselected Parts Warning

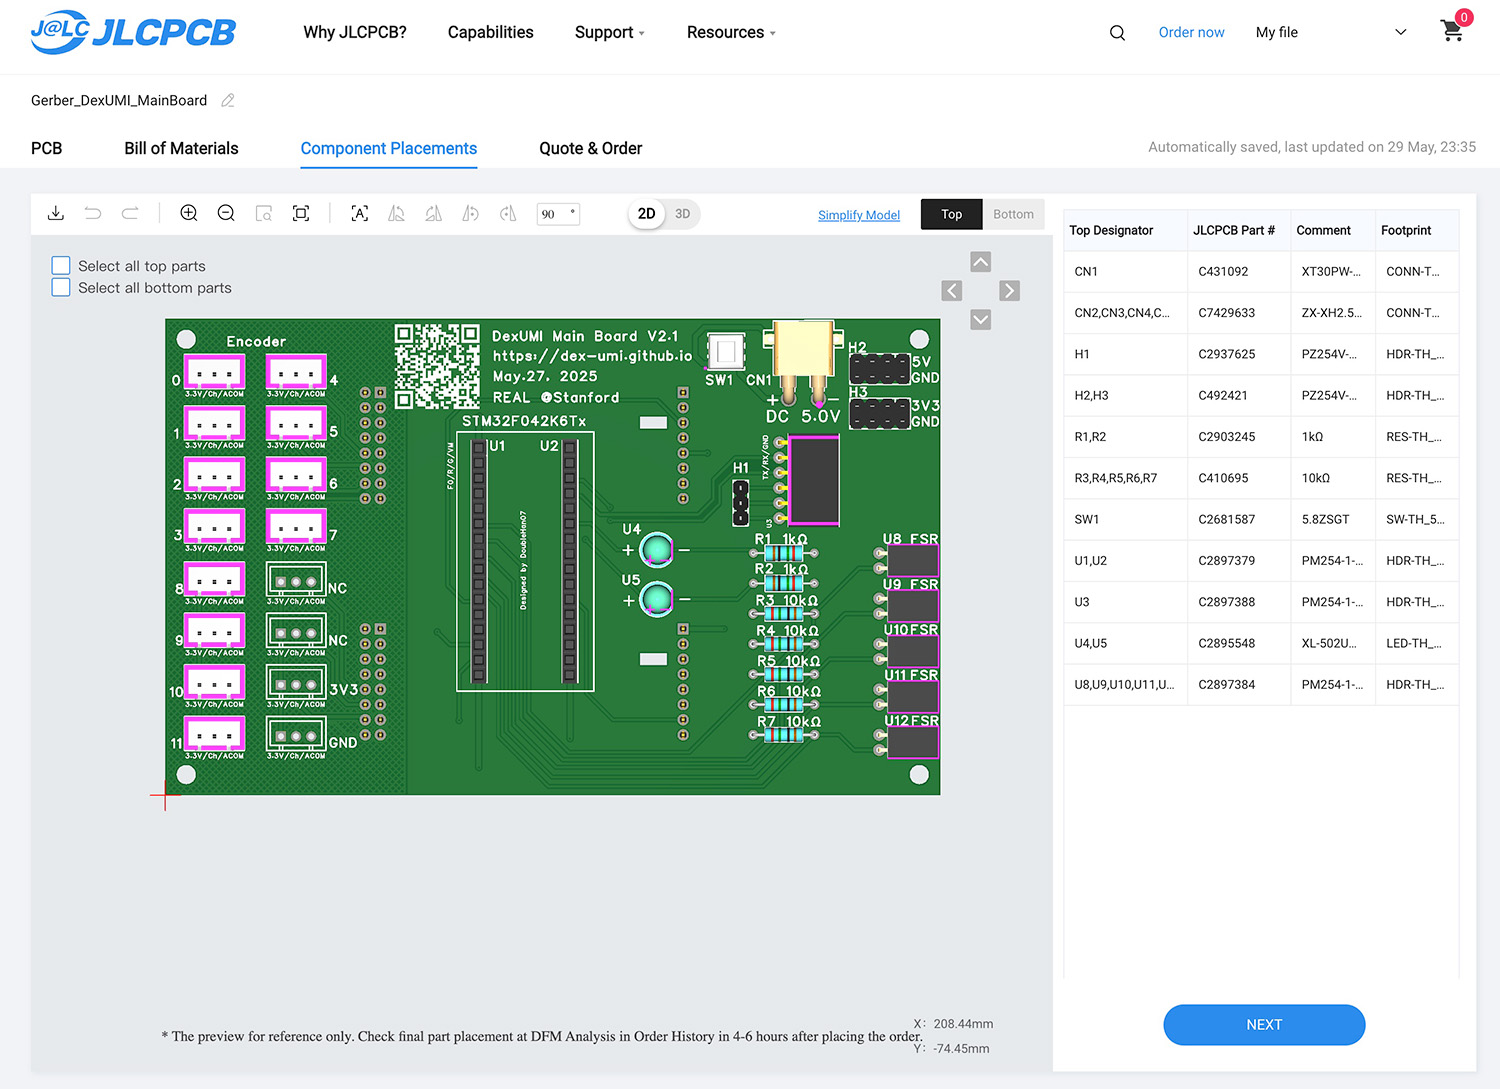
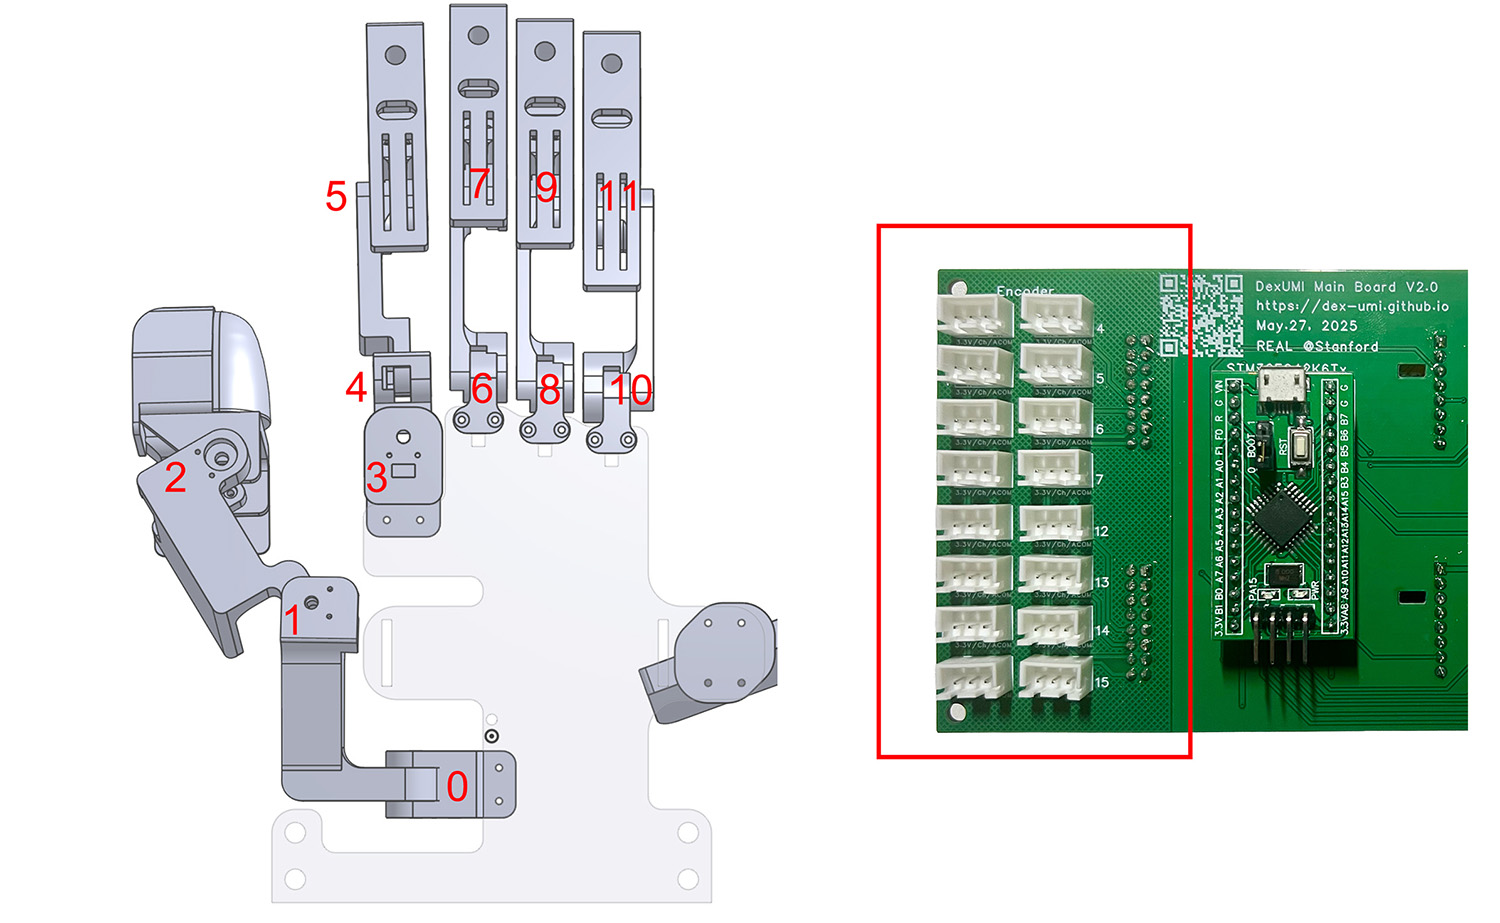
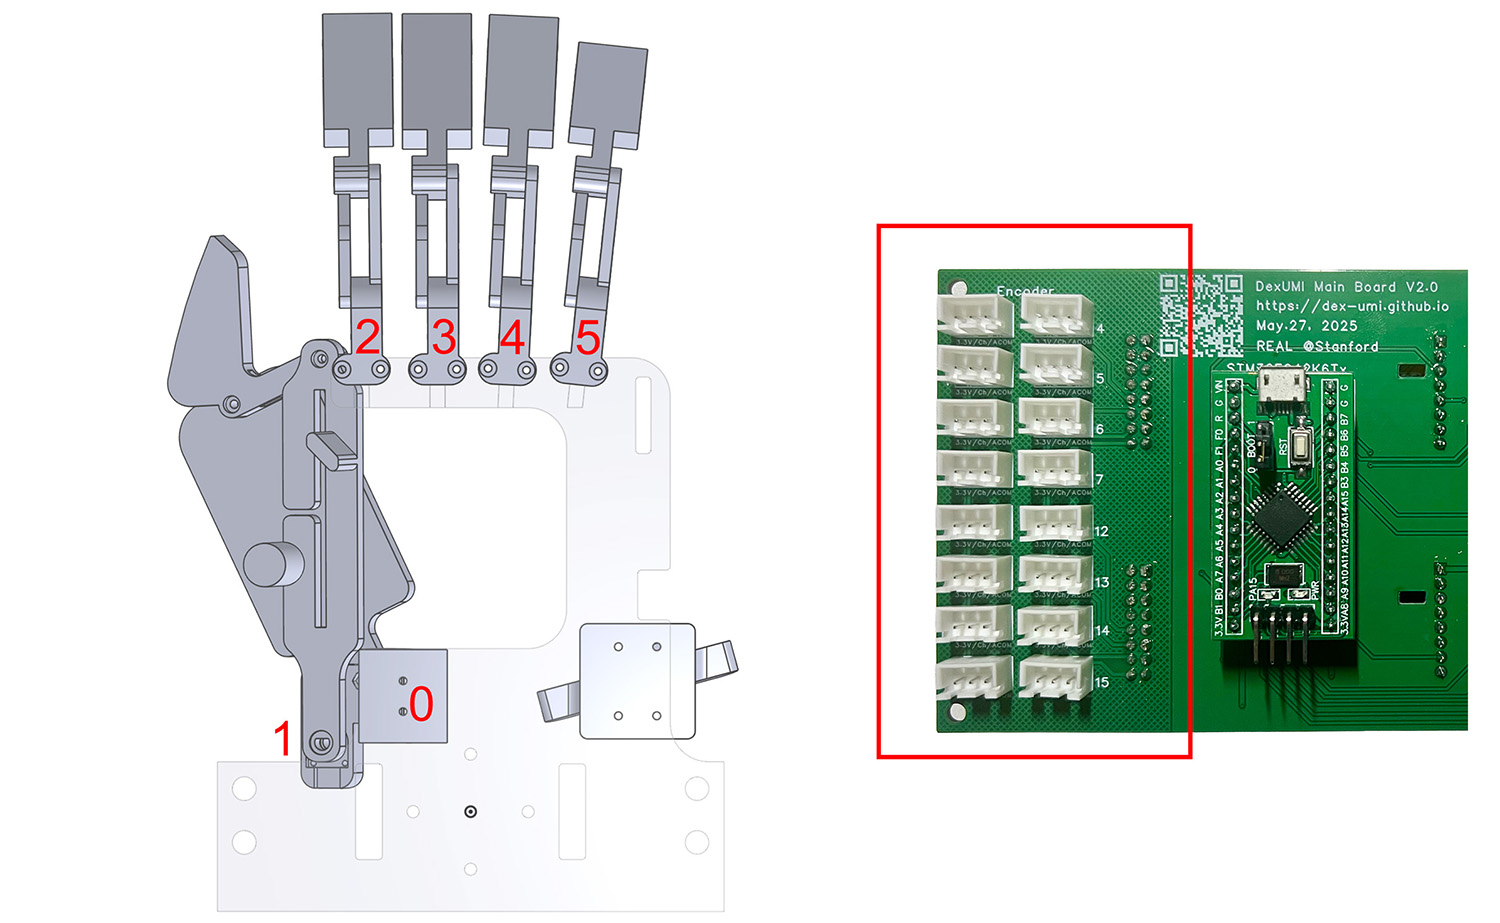
🎉 Hurray! The last step! You can now preview the 3D model of your circuit board. If all parts are rendered correctly and look similar to the images below, go ahead and click the NEXT button to place the order!

Board Top View
Board Bottom View

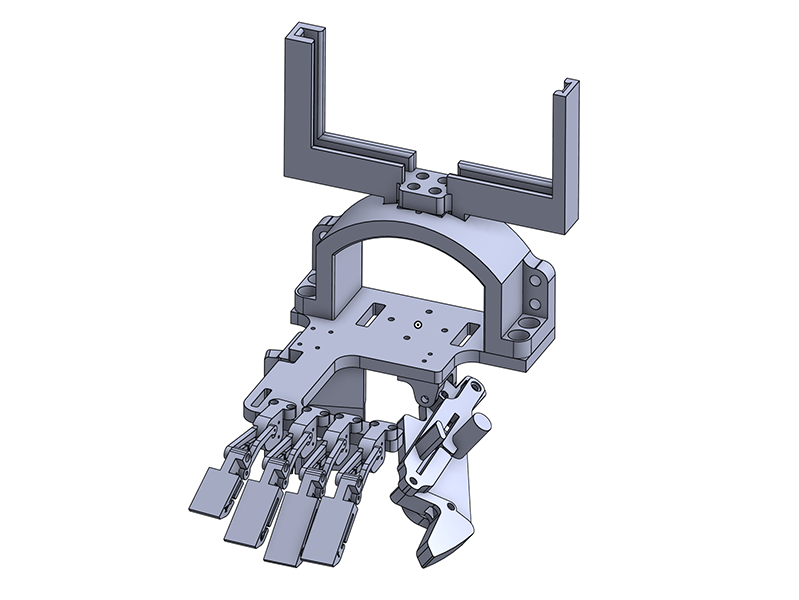
Structural Bill of Materials (BOM)

All structural parts needed to build Inspire Hand and XHand DexUMI

This is a compact summary of all hardware components required. Tables are grouped by device and category. Click the links to purchase directly.

Inspire Hand DexUMI

Part Qty Price
Materials
Bambu PLA-CF Matcha Green 400g $34.99 (1kg)
Electronics
XH 2.54mm-3P Wire 50cm 6 $7.65 (5pcs)
RDC506018A Encoder: DigiKey, Mouser 6 $1.66 (1pc)
Fasteners
M1x8mm Screws 4 $7.99 (100pcs)
M1 Hex Nuts 4 $4.47 (10pcs)
M2 Screws (6/12/16mm) 8+1+2 $8.99 (660pcs kit)
M2 Lock Nuts 11 $9.99 (100pcs)
M3 Lock Nuts 4 $5.99 (120pcs)
D-shape Screws
M3 Shoulder Screws 8mm 4 $5.29 (1pc)
M3 Shoulder Screws 15mm 1 $4.33 (1pc)
M3 Shoulder Screws 25mm 1 $4.94 (1pc)
Accessories
Finger Sleeves 10 $9.97 (40pcs)
3M TB641 Gripping Material 1.5ft $54.14 (15 ft)
iPhone Mounting
M3x16mm Screws + M3 Hex Nuts 4+4 $8.99 (600pcs kit)
M6x20mm Screws + M6 Hex Nuts 4+4 $8.99 (172pcs kit)
Camera System
OAK-1 W 1 $249 (1pc)
M4x6mm Screws 2 $9.99 (300pcs kit)
USB-C to USB-A (10ft) 1 $16.99 (1pc)
Consumables
Loctite Threadlocker 242 0.03 fl oz $5.98 (0.2 fl oz)
UV Resin 20g $11.99 (30g)
Super Glue 1pc $6.98 (4pcs)
Lubricate Grease 0.2oz $5.98 (8oz)

XHand DexUMI

Part Qty Price
Materials
Bambu PLA-CF Matcha Green 600g $34.99 (1kg)
Electronics
XH 2.54mm-3P Wire 50cm 12 $7.65 (5pcs)
RDC506018A Encoder: DigiKey, Mouser 12 $1.66 (1pc)
Fasteners
M2 Screws (12/16mm), M2 Hex Nuts 7+6+8 $8.99 (660pcs kit)
M2 Lock Nuts 5 $9.99 (100pcs)
M3 Hex Nuts 7 $8.99 (600pcs kit)
M3 Lock Nuts 7 $5.99 (120pcs)
D-shape Screws
M3 Shoulder Screws 10mm 9 $3.12 (1pc)
M3 Shoulder Screws 20mm 3 $5.65 (1pc)
Accessories
Cable Ties 5 $6.28 (60pcs)
3M TB641 Gripping Material 1.5ft $54.14 (15 ft)
iPhone Mounting
M3x16mm Screws + M3 Hex Nuts 4+4 same as above
M6x20mm Screws + M6 Hex Nuts 4+4 $8.99 (172pcs kit)
Camera System
OAK-1 W 1 $249 (1pc)
M4x6mm Screws 2 $9.99 (300pcs kit)
USB-C to USB-A (10ft) 1 $16.99 (1pc)
Consumables
Loctite Threadlocker 242 0.02 fl oz $5.98 (0.2 fl oz)
UV Resin 20g $11.99 (30g)
Super Glue 1pc $6.98 (4pcs)
Lubricate Grease 0.2oz $5.98 (8oz)

Electronics Bill of Materials (BOM)

All electronic components and modules for DexUMI circuits

This is a compact summary of all hardware components required. Tables are grouped by device and category. Click the links to purchase directly.

Electronic Modules

Part Qty Price
Modules
STM32F042K6T6 Core Board 1 $15.39 (1pc)
ADS1256 Module 2 $15.44 (1pc)
USB to TTL Module 1 $9.95 (3pcs)
ST-Link V2 Downloader 3 $5.99 (1pc)
Accessories
DC Power Supply 1 $60.15 (1pc)
XT30 Female Connectors w/ Wire 1 $8.58 (5pcs)
Dupont Cable Male to Female 3 $6.98 (120pcs assorted)
Automotive Cloth Tape 1 rolls $9.99 (2pcs)

Prepare Common Components

Essential components needed for both exoskeleton

Items

  • D-screw components (screws, nuts, and tools)
  • Encoder cable materials
  • Encoder module parts

Make D-Screw

Prepare Encoder Cable

Build Encoder Module

XHand Exoskeleton Assembly Guide

XHand Index Assembly Guide

XHand Middle/Ring/Pinky Assembly Guide

Xhand Thumb Assembly Guide

Assemble Fingers to the Palm

Oak Camera Mounting

Connect XHand Exoskeleton to the DexUMI Circuit Board

Follow the wiring sequence shown in the image below to connect encoders to the circuit board.

XHand Connection Diagram

Inspire Hand Exoskeleton Assembly

Inspire Index/Middle/Ring/Pinky Assembly Guide

Inspire Thumb Assembly Guide

Step 3: Oak Camera Mounting

Connect Inspire Hand Exoskeleton to the DexUMI Circuit Board

Follow the wiring sequence shown in the image below to connect encoders to the circuit board.

Inspire Hand Connection Diagram

Share Steps

Steps needed for both exoskeleton

iPhone Mounting

Finger Grip Tape

Flash the Firmware to DexUMI MCU

To flash the firmware into the MCU, we first need to install openocd on the target PC:

sudo apt-get install openocd

Then connect the MCU with ST-LINK V2, as shown below:

ST-LINK Connection Diagram

Finally, run this script to flash the firmware into the MCU.

For Inspire Hand DexUMI:

openocd -f interface/stlink-v2.cfg -f target/stm32f0x.cfg -c "program DexUMI_Inspire.hex verify reset exit"

For XHand DexUMI:

openocd -f interface/stlink-v2.cfg -f target/stm32f0x.cfg -c "program DexUMI_XHand.hex verify reset exit"

Connect the DexUMI Circuit Board to Your PC

First, we need to install the MCU board and ADC modules on the DexUMI circuit board.

Insert the MCU at the top of the board, as shown below:

Install STM32 MCU

Then insert the ADC modules at the bottom of the board:

Install ADC Modules

Next, power on the board. Connect DC 5.0V 1.0A through the XT30 female connector using a wired input, then press the switch to power up.

Finally, connect the board to your PC using a USB-TTL module, as shown below:

Connect with USB-TTL